Open Source Intercom Solution

In modern TV production, effective communication is crucial. Legacy intercom systems have often been complex, costly, and proprietary, limiting flexibility and scalability. The Open Source Intercom Solution, developed in cooperation with major Nordic broadcasters, leverages WebRTC technology to provide a modern, scalable, and easy-to-use alternative.

This guide will walk you through setting up and using the latest release of the Open Source Intercom Solution, ensuring seamless communication in your production environment. Whether you’re a seasoned broadcast professional or new to live production, this guide provides all the details you need to deploy and operate the system efficiently.

Key Features of the New Release

The latest update brings significant improvements, ensuring a more streamlined and user-friendly experience.

Some of the key enhancements include:

• A completely reworked and improved user interface, designed to be more intuitive and easier to navigate.

• Support for multiple calls in one browser window, enabling users to manage multiple communication lines more efficiently without switching between windows.

• Device switching during a call, allowing seamless transitions between different audio input and output devices.

• Volume control visibility on supported devices, ensuring that users can adjust audio levels more precisely.

• New participant muting functionality, allowing users to mute other participants when necessary to maintain clear communication.

• Audio functionality, where program output audio is automatically lowered when another participant speaks on a different line, enhancing clarity in live production settings.

• Numerous bug fixes and general performance improvements, ensuring a smoother, more reliable experience.

These features collectively enhance usability, making the intercom solution a powerful tool for broadcast communication.

Prerequisites

Before getting started, ensure you have the following in place:

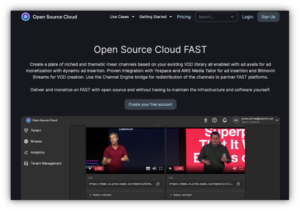
• An Open Source Cloud account (https://app.osaas.io/), which provides access to the hosted intercom service.

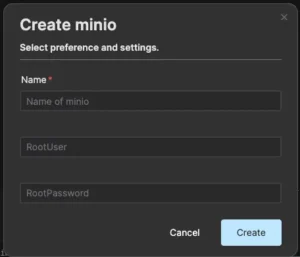
• An Intercom service instance created, enabling communication channels to be established.

If you don’t have an account yet, signing up on https://app.osaas.io/ is quick and simple.

Logging In & Opening the Intercom App

To begin using the Open Source Intercom Solution, follow these steps:

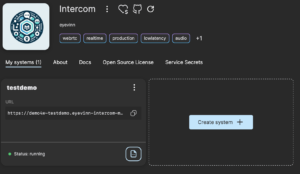
• Log into https://app.osaas.io/.

• Navigate to the Intercom service in your dashboard.

• Click the three dots next to your running service and select Open Application to launch the intercom interface.

Once opened, the system is ready for production setup and communication.

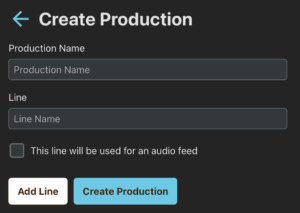
Setting Up a Production

To configure a new production, follow these steps:

• In the Create Production section, enter a Production Name.

• Specify a Line Name (both fields are mandatory for creating a new production).

• If required, click Add Line to include multiple communication lines for different teams.

• Click Create Production to generate a unique Production ID.

Your new production will now be added to the list of recent productions.

To share the production with others, join the production and copy the URL from your browser’s address bar.

Joining a Production

Once a production is set up, users can join by following these steps:

• In the Join Production section, enter your Production ID and your Name.

• Choose the appropriate Microphone and Speaker settings.

• If your desired device does not appear, refresh the browser page.

• iPhone users may need to reload the page to detect the correct microphone and speaker.

• Select the Production Line you wish to join and click Join.

After joining, you will have full access to the intercom communication features.

Using the Intercom System

Once inside the system, users can leverage the following controls:

• Mute/unmute audio, allowing participants to manage their audio input effectively.

• Mute/unmute microphone, giving users control over their speaking permissions.

• Push-to-Talk (PTT) button, which activates the microphone only while pressed, ensuring clear and concise communication.

• Hotkeys support, allowing integration with external hardware like StreamDeck for more streamlined operations.

These features ensure a seamless and efficient communication experience for production teams.

Why Choose the Open Source Intercom Solution?

    A Flexible, Open-Source Alternative to Proprietary Systems

Traditional intercom systems often come with high costs, proprietary limitations, and complex infrastructure requirements. The Open Source Intercom Solution eliminates these barriers, offering a more affordable, adaptable, and high-performance alternative.

    Designed for Simplicity & Scalability

• Easy deployment: The system is available as a containerized package, meaning it can be deployed on standard IT infrastructure or hosted remotely in the cloud.

• Compatible with any retail hardware, so you’re not tied to a specific vendor’s equipment.

• Quick setup, enabling users to configure productions in a matter of seconds.

• High-fidelity audio powered by the Opus codec, ensuring professional-grade sound quality.

    Powered by WebRTC for Real-Time Communication

The system leverages WebRTC technology, which is widely adopted for real-time communication applications, offering low latency and cross-platform support. The architecture consists of:

• Symphony Media Bridge (SMB) – The core Selective Forwarding Unit (SFU) that routes media streams efficiently between participants.

• Intercom Manager – Handles backend communication control and session management.

• Intercom Frontend Manager – Provides an intuitive, web-based user interface

By using modern, web-based technologies, this solution ensures reliable performance, ease of use, and broad compatibility with existing workflows.

Conclusion

The Open Source Intercom Solution is a forward-thinking approach to broadcast communication. With its user-friendly design, open-source flexibility, and superior audio performance, it offers a scalable and cost-effective alternative to traditional intercom systems. Whether you’re a broadcaster looking to modernize your communication infrastructure or a production team in need of an intuitive and efficient intercom system, this solution provides a seamless way to stay connected.

Get started today by logging in to https://app.osaas.io/ and exploring the possibilities of modern, open-source intercom technology!

Simplify Your File Storage with Open Source Cloud and MinIO

Ever struggled with managing digital files for your project? Whether you’re a developer, content creator, or just someone who needs reliable file storage, I’ve got a game-changing solution that’s both powerful and surprisingly easy to use.

What Exactly is Object Storage?

Think of object storage like a super-smart, infinitely expandable digital filing cabinet. Instead of saving files on your local computer or a single hard drive, you can store them in the cloud, access them from anywhere, and scale your storage as your needs grow. The best part? You don’t need to be a tech wizard to use it.

Why Open Source Cloud with MinIO?

Traditional cloud storage can be expensive and complicated. Open Source Cloud offers a refreshing alternative:

– Free tier with 50 GB of storage
– Completely compatible with popular tools like AWS S3
– No complex setup or massive technical knowledge required
– Supports media, images, documents, and more

Your Quick Start Guide

Getting Set Up

– Create an Account: Sign up for Open Source Cloud (it’s free!)
– Install the Basics: You’ll need NodeJS and a few simple command-line tools
– Follow the simple instructions: https://docs.osaas.io/osaas.wiki/Service%3A-MinIO.html
– Create Your Storage: Set up a MinIO storage service in just a few clicks

Creating Your First Bucket

A “bucket” is just a fancy term for a folder in the cloud. You can create as many as you need for different projects – one for photos, another for documents, another for backups.

Uploading and Accessing Files:

– Upload files using simple commands
– Generate shareable links
– Access your files from any device
– Integrate with existing tools and applications

Real-World Use Cases:

– Storing poster and image objects for a streaming service
– Backing up project files
– Sharing large media files with team members
– Creating scalable media libraries

The Open Source Difference

What makes this special isn’t just the technology – it’s the philosophy. Open Source Cloud shares revenue with the open-source authors, which means you’re supporting the community of developers who create these amazing tools.

Getting Started is Easier Than You Think

Don’t let technical jargon intimidate you. With Open Source Cloud’s MinIO, you can have a professional-grade storage solution up and running in minutes, without spending a fortune or getting a computer science degree.

Ready to simplify your file storage?

– Visit Open Source Cloud
– Sign up for a free account
– Start storing your files in minutes

Additional Resources:

– Open Source Cloud: https://app.osaas.io
– API Documentation: https://api.osaas.io

Tip: Start small, explore, and scale as you grow!

How to create a FAST channel in Open Source Cloud

Creating Free Ad-Supported Streaming TV (FAST) channels is becoming increasingly popular among content creators and broadcasters aiming to reach a wider audience without the need for a subscription model.

With the rise of open-source technologies and cloud platforms, launching your own FAST channel is more accessible than ever. The Open Source Cloud, with its array of tools and services, offers a comprehensive environment to deploy a FAST Channel Engine. This article guides you through the process of setting up a FAST channel using the FAST Channel Engine within the Open Source Cloud using already transcoded videos.

The base for the virtual channel is transcoded and packaged HLS VoD assets stored on an origin. The advantage with virtual channels is that you only prepare and encode the content once.

Prerequisites

As a prerequisite for creating a linear channel using the FAST Channel Engine, you need to have your VOD assets transcoded into HLS format. These assets should be properly segmented and stored on an origin server or accessible file storage system.

Ensuring that your media files are in HLS format and readily accessible allows the channel engine to seamlessly retrieve and stream the content according to your schedule.

Prepare a playlist, in other words a URL pointing to a text file containing a list of .m3u8 URLs, each representing a streamable video segment. One way to do this is to use gist.

– Go to https://gist.github.com
– Enter a name of the playlist in Filename (e.g. playlist.txt)
– Enter a list of URL to HLS manifests (one per line), for example:

https://demo.osc.technology/fast_1/manifest.m3u8
https://demo.osc.technology/fast_2/manifest.m3u8
https://demo.osc.technology/fast_3/manifest.m3u8

– Press Create public gist (green button)
– Press “Raw” on your created playlist file
– Copy the URL to the created playlist file e.g. https://gist.github.com/xxx/playlist.txt

Create a channel

Open your web browser and go to https://app.osaas.io/ and login using your credentials. Once logged in, locate the “Subscriptions” item in the menu on the left-hand side of your screen and click on it. This will take you to the page where you can manage and explore available services.

On the Subscriptions page, look for the card labeled “FAST Channel Engine.” This represents the service you’ll use to create your FAST channel. Next to the service title, there’s a drop-down menu symbolized by three dots. Click on this menu to reveal more options and select “Create channel.”

Enter a meaningful name for your channel. This name will help you identify it among other channels you may create. In this example the type “Playlist” is used. This option indicates that your channel will play content sequentially from a playlist you provide.

Enter the URL to your playlist in the “URL” field, e.g. the playlist created earlier (https://gist.github.com/xxx/playlist.txt). Make sure your playlist is correctly formatted and accessible online.

After entering all necessary information, press the “create” button. The platform will now process your request and start setting up your channel based on the playlist provided. This process may take a few moments. You can monitor the progress directly on the platform.

Once your channel is successfully created, find the channel’s drop-down menu (again, symbolized by three dots). Click on it and select “Copy URL” to copy the channel URL to your clipboard.

Open a new tab in your browser or launch a web player that supports .m3u8 streaming, safari or https://web.player.eyevinn.technology. Paste the copied URL into the player’s input field to start streaming your channel. This step is crucial for ensuring everything is working correctly and allows you to preview your channel’s content as your audience would.

Conclusion

Creating a FAST channel using the FAST Channel Engine in the Open Source Cloud is a powerful way to reach audiences with your content. By leveraging open-source technologies and cloud infrastructure, content creators can deploy scalable, high-performance streaming channels supported by ads.

This approach enable content distribution, allowing creators to broadcast their content globally without the need for heavy infrastructure investments.